After having completed the Jacobean, Canvaswork and Silk Shading modules of the Royal School of Needlework Certificate Course I needed to complete the Goldwork module to complete the course. I chose to complete this module as a Summer Intensive as goldwork is quite delicate (especially the cutwork) and I didn’t want to have travel back and forth to the Netherlands with it.
Last year I completed the canvaswork module as an intensive too and as it definitely is a lot of work to pack into 2 weeks I decided to give myself a head start by discussing my design during term time with the tutors so I can have it painted on in class and complete the felt padding at home before the intensive started. This meant I ‘only’ had to finish the string-padding during the intensive before I could start stitching the actual goldwork.

This worked really well for me, as I didn’t need to do any homework in the evening, had time to restitch a few areas the tutors (and I) weren’t happy with. I also had plenty of time to finish the mounting which I was really happy with as it is a bit I still struggle with.
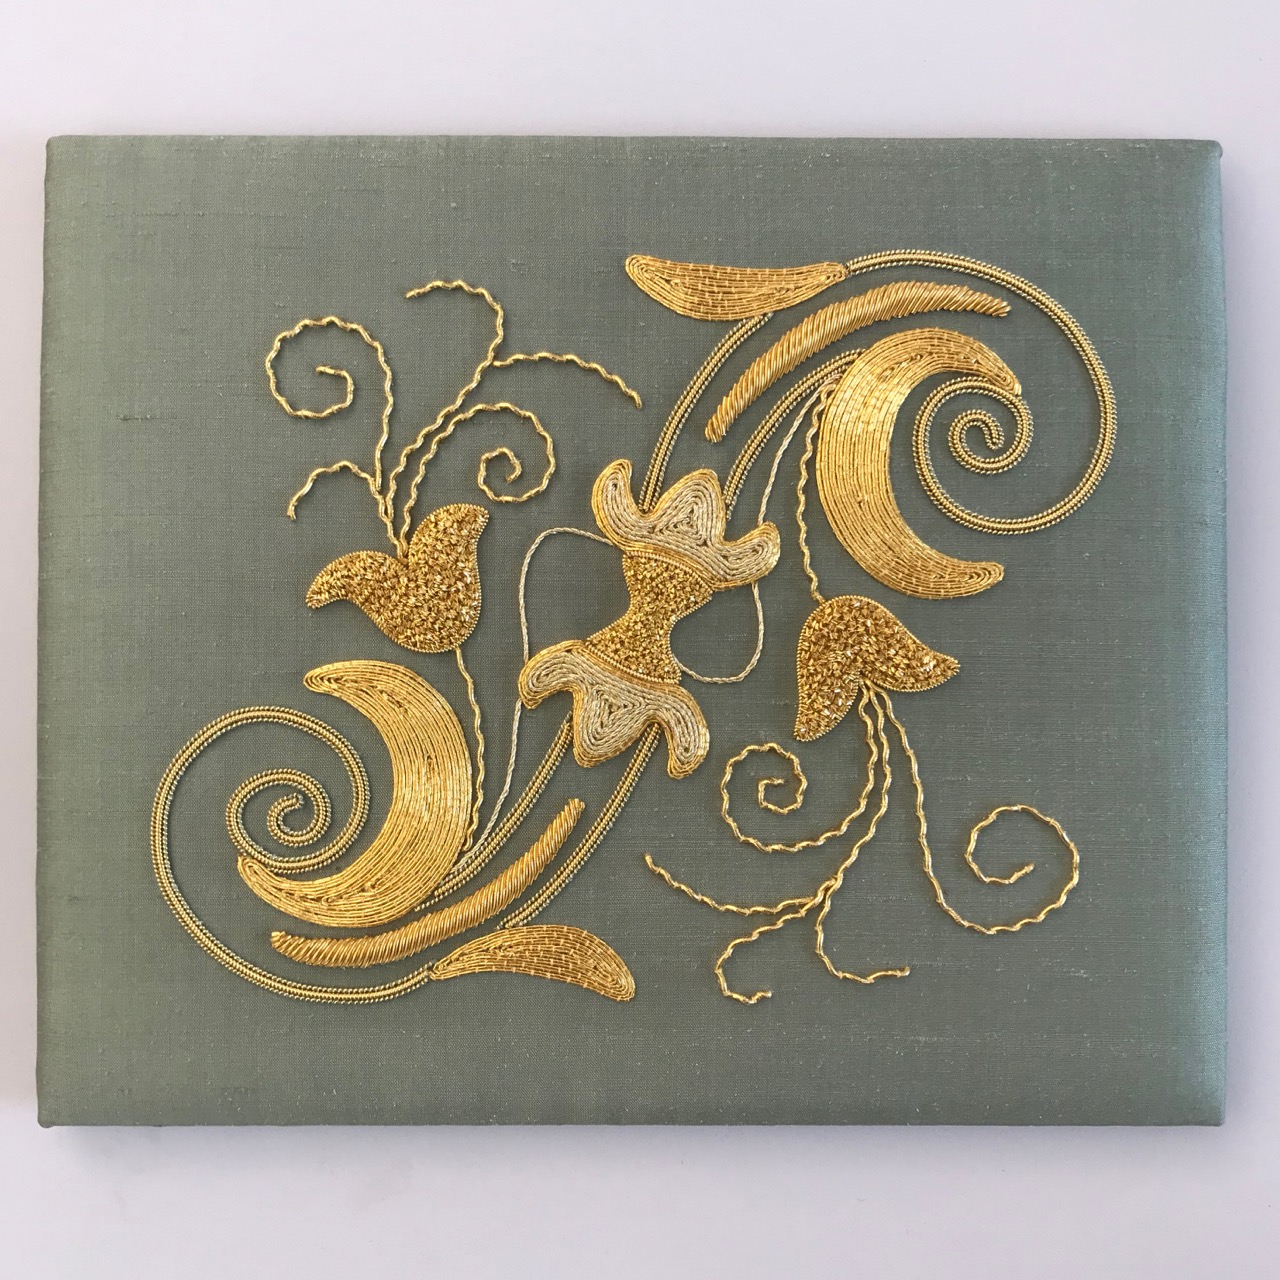
My design is based on the woodcarvings of the screen of the Princes Chapel in the Grote Kerk of Onze-Lieve-Vrouwekerk (Church of Our Lady) in Breda, the Netherlands.


I thought this design would lend itself really well to the goldwork technique and I loved the fact that it gives the illusion of being symmetrical when it is not. Now I have completed stitching it I am really glad I have picked this design as it has worked really well and has almost created a period piece. Even though I am not a ‘gold’ fan I have fallen in love with this design.
In picking this design I did make it rather difficult for myself. For one, I should not have painted on all of the design lines. When I was creating the design I was not given another option for transferring the design at the time rather than painting on the complete lines. I should have used paint to dot on the design or used tacking stitches which would have been much easier to cover. Because of the curves in the Rococo thread, which I used for the vines, it was impossible to cover those lines. Well, I suppose that is a big lesson learned for next time. Fortunately, the lines are not visible from the front but only when you look at it from the side.


The paint lines were a blessing in discuisse too though, as for the big scroll I got to use overstretched pearl purl with a DMC core in the same colour as the silk on either side of the thicker pearl purl line. This was a suggestion of my tutor and it was just the best idea ever as it works really well and is very inkeeping with the design. I think it looks even better with the overstretched pearl purl than without. It was very fiddly to make them up as I used very fine pearl purl to make it different from the medium pearl purl of the main outline (I almost spend the complete work-on-your-own Sunday making them up), but it was worth it.


Another difficult bit in this design is creating the areas with brick-couched jap. In designing it, I thought I would have to couch lines and plunge a lot of ends and do the odd corner, but my tutor said it would be better (and nicer) to continue round in one great spiral. However, the corners at the tips of the shapes get smaller and smaller and it is really difficult to turn the jap neatly 180 degrees back on itself. However, it did become easier with practice and with the help of some extra couching stitches.


The technique which scared me the most was the cutwork, however, in hindsight it wasn’t as difficult as I thought. I was especially wary of keeping the 45-degree angle, as I am not very good at the with satin stitch. However, when I mentioned this to the tutor she gave me some really good pointers and it went in really smoothly with only a few minor (and acceptable) cracks.
Because the goldwork, and especially the cutwork, is very delicate and breaks easily you have to be very careful when mounting. The future tutors made up a bubblewrap frame custom made for our design and the location of the cutwork so we could turn our work upside down for mounting and protect your work. I was being very very careful and managed to mount without any damage.


Because of the bulk on the back of the work (because of the plunged ends) you need to add a layer of bumpf between the calico covered mount board and your work. It gives the finished piece a cushion-like appearance. The bumpf does make it really difficult to get neat corners, but I did the best I could. I spend ages on the sateen, as it is usually one of the main areas I lose marks on so I made sure it was all even, tight and that there are no slip stitches visible. I hope I have managed a better job this time around.
I really enjoyed attending the summer intensive. This year there were three classrooms with six students, a tutor, and a future tutor assistant each. Our class had four students doing the goldwork certificate module, one student doing the stumpwork diploma module and one student doing the applique diploma module. It was really great to have a mix of students and disciplines as you were able to pick up some ideas for your next modules too. An advantage of the intensive is that you have the same tutor for the two weeks.
We had a brilliant tutor for our class and I am actually considering doing another intensive (for my diploma) next year when she is teaching as she was just so helpful, motivating and fun. I’ll just have to see whether I can make it fit with my work commitments and holiday plans. It is also great that you spend the two weeks with the same 6 students as you get to follow each other’s progress and get to know each other better. We have had so many laughs in class and it made a very enjoyable two weeks!
I will do another post about my project once it has been assessed, which should be around the end of September. I’ll be back at the RSN in October to start the diploma!


This is such a lovely design, and well done on getting it done in the two weeks! It sounds like the intensives really are the way to go, especially if you have had a ‘little’ head start. This design really lends itself to goldwork, and I get the feeling this may be one of your more favoured techniques! Good luck with the Diploma.
LikeLiked by 1 person
Thank you Catherine! Yes I really like the intensives, but because of work commitments it is sometimes difficult to fit them in as most colleagues take holidays during the summer so it is not always easy for me to take time off. I really do love goldwork and the choice of design really helped. It is difficult to make it neat and get the best result possible, so I definitely need more practice!
LikeLiked by 1 person
That’s a very successful design – well done! It’s clear that you are also learning to make the most of the intensive sessions!
LikeLiked by 1 person
Thank you! Yes definitely. I want to make the most of my time in class when the tutors are there and do the things I do at home at home.
LikeLiked by 1 person
A beautiful piece with a really good finish. So glad you had sufficient to get it all done the way you wanted it. Looking forward to hearing of your marks. See you in October.
LikeLiked by 1 person
Thank you Sally! Fingers crossed for my marks. It was lovely to see you again. I’ll see you in October! Hopefully we will both have some spare time for meeting up for a drink!
LikeLiked by 1 person
This looks absolutely beautiful – I have always admired gold work – but like you say it is quite precious to sew with. Hope you get good results. Well Done
LikeLiked by 1 person
Thank you!!! Yes it is. With thread you can get away with much more, with the gold threads every mistake is very noticeable.
LikeLike