At the beginning of last month, Catherine (of Hillview Embroidery) and I attended a workshop by Jenny Adin-Christie at Au ver a Soie in Paris. This weekend I finished the brooch we started during the workshop.
It is really fun little project and in the process of making the brooch, you learn lots of essential goldwork techniques such as couching, working with purl and chipping.
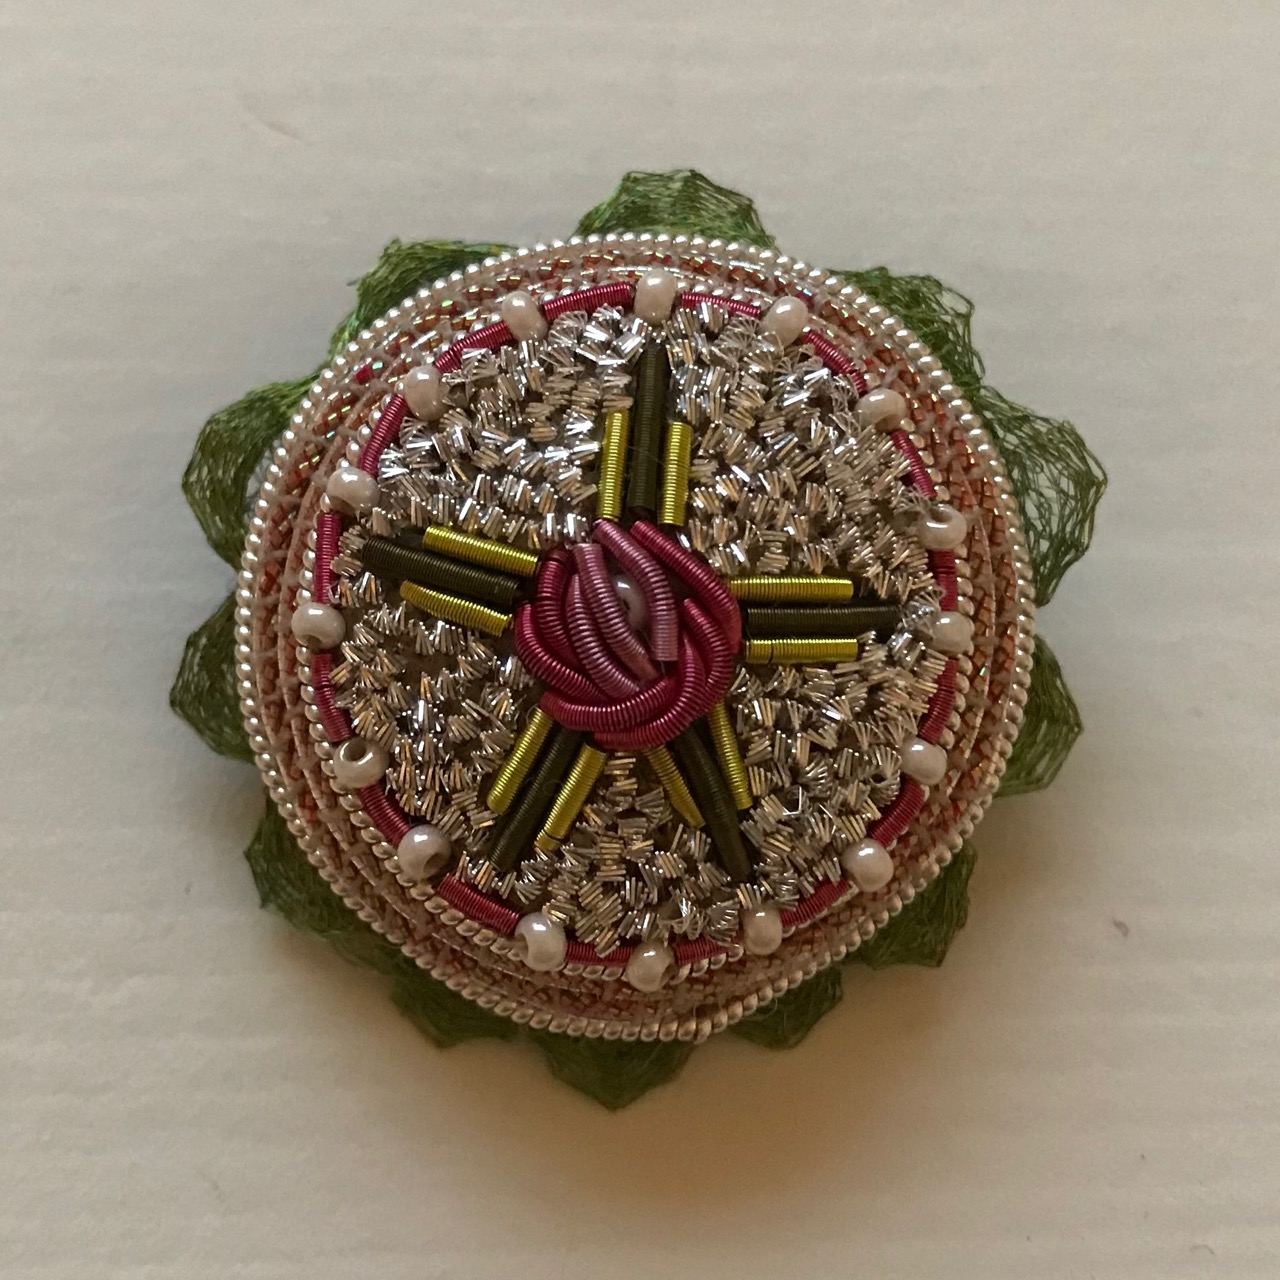
At the end of the workshop, I had stitched the rose using smooth purl and done most of the couching with the red opal 3 ply-twist and silver passing.


When I picked up the project again last Friday I first finished the couching and plunged the threads. During the workshop, Jenny showed us how to fray the threads once you have plunged them so you can flatten them out in the back when securing them so you don’t get a bulk of threads in one spot.
Next, I attached a row of purl purl on either side of the couching. The final inside row was made up of smooth purl and beads. I tried my best at keeping the spacing equal but I found it quite difficult when stitching in the round to get the ends to meet up. In the end, I think I did quite well.


The next and final embroidery part of this brooch is working chipping in the remaining open spaces. Chipwork is not the most difficult stitch but with all of the smooth purl already in place, it felt like Russian roulette when stitching it. The problem is that you have to bring up your needle quite a few times doing chipwork and it is so easy to bring up your needle in the wrong place and pierce and ruin the purl.
Jenny told us how to bounce your needle from outside of the work in so you could determine where your needle is on the underside of your work, but that still didn’t prevent me coming up in the wrong place quite a few time. Fortunately, the damage was not too bad so I decided to leave the purl in. Taking it out and putting a new one in would probably have caused more problems.
I also found it difficult to keep the dome shape of the brooch intact as when you stitch your holding stitches into the felt it tends to create dips which destorts the lovely curved shape I worked so hard on to achieve during the workshop. Fortunately when you put the chipping in place it is very forgiving and I ended up turning my hoop over to fasten on and off at the back to prevent any further distortions.

Once the embroidery is finished you need to put a running stitch around the outside of your embroidery, cut just outside that line and gather the fabric at the back. Next, you stitch some really fun metallic mesh ribbon around the outside to create a scalloped edge.


After stitching the brooch clasp to the backing felt you glue it to the back of your embroidery and leave to dry for 24 hrs after which time you can start wearing your brooch.
I really enjoyed stitching this little project. The kit was wonderful. It has a large booklet with very detailed instructions and lots of tips and tricks to get the best result. There are plenty of detailed drawings so you know exactly how to position your needle when doing a particular stitch. I don’t think I have ever come across such detailed instructinos.
There are also plenty of supplies in the kit so you don’t have to worry when you ruin pieces of purl as there is plenty of spare. The only thread I was scared of running out of was the bright check purl for the chipwork but I had about an inch spare at the end.
I will definitely try and do another workshop with Jenny as I learned so much during her class and during the finishing of the project.


It’s beautiful! You did a great job
LikeLiked by 1 person
Thank you so much!
LikeLike
The kit looks like fun especially all those bright colors. Jenny is coming to our seminar in July. I think I will get one of her brooches.
LikeLiked by 1 person
You will have a great time! Enjoy!
LikeLike
It’s gorgeous – I’m sure you will love wearing it, too!
LikeLiked by 1 person
Thank you! Yes at least it something you can show while wearing it, but I think I will constantly checking if it is still there as I would be scared to lose it!
LikeLiked by 1 person
It looks great! It was a great class, and I too would love to do another class with her. And I think her kits are the gold standard in kits, everything about it was great wasn’t it?!
LikeLiked by 1 person
Thank you Catherine! It was wonderful, I think I will keep the booklet for reference and the supplies were just great. Did you see the project she is teaching at Beating around the bush. She had the sample with her at au ver a soie and I would really like to do it as it look amazing. I think I will email her and ask if she is teaching it anywhere else.
LikeLiked by 1 person
I think all her pieces are amazing! And that harp she’s teaching at the moment. Just incredible! You can learn a lot from her!
LikeLiked by 1 person
Yes definitely! I haven’t seen that one yet I will look it up!
LikeLiked by 1 person
Your brooch is beautiful 🙂 So glad you were able to preserve the lovely domed effect, and the purl pieces might have been fiddly to stitch on but they are so sparkly and pretty!
LikeLiked by 1 person
Thank you Aurelia! I am glad I did. I suppose it gets better/easier with practice to get the purl pieces to sit and stay where they are supposed to!
LikeLike
Very pretty
LikeLiked by 1 person
Thank you!!!
LikeLike
Prachtig Marlous. Wat een werk.😀👍
LikeLiked by 1 person
Dankjewel Will! Valt wel mee hoor, je moet alleen heel voorzichtig werken.
LikeLike
Super job! I loved stitching Jenny’s brooches – but am so jealous that you got to one of her workshops – I bet you learnt so much more!
LikeLiked by 1 person
Thank you! Yes (even though the booklet already has so much information!). I wish I had time during the workshop to write things down as she gave us so much information! It is so difficult to remember everything and stitch at the same time! I need a tape-recorder!
LikeLiked by 1 person