
During the past week, I have been embroidering a Sashiko sampler.
Sashiko, which literally means little stabs or little pierce, is a form of decorative reinforcement stitching from Japan that started out in the 17th century. It was originally used to reinforce homespun clothes and to repair worn places or tears with patches. The technique only uses running stitches. The patterns are usually geometric one, but there also designs with flowers and animals. Traditionally white thread is used on indigo cloth.
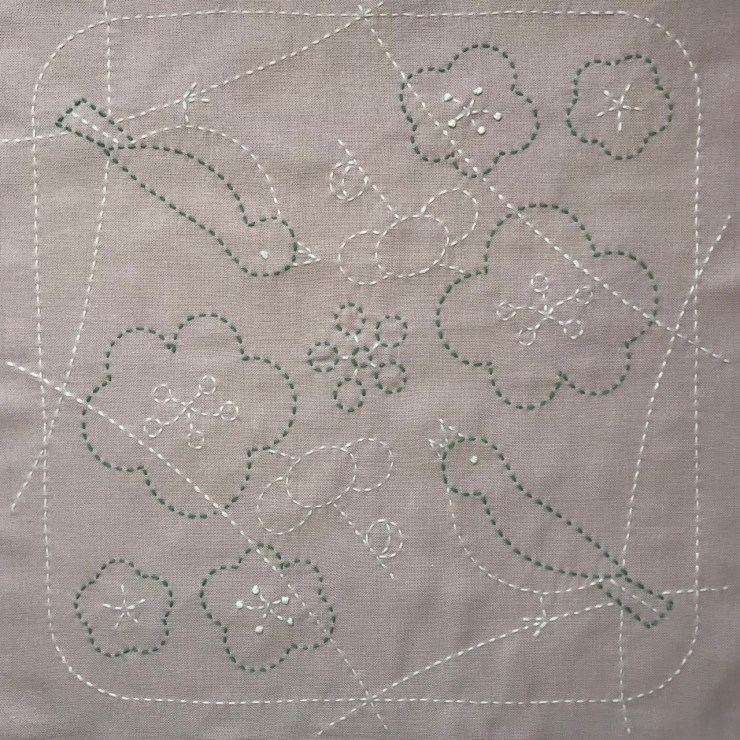
As indigo blue isn’t normally a colour I would choose I was really please to see that Sashiko-ya at the Aiguille en Fête show also sold dusty pink, white, ochre and light blue cloths. I chose a design that appealed to me with two birds and several flowers. As I did want to stay true to the tradition I picked up some off-white thread (colour #2) to stitch the design but worrying that it might not be as striking as white on indigo I also picked up some green thread (colour #7) which I thought matched well. I also picked up a packet of Sashiko needles and I was ready to start stitching. All of the items I have bought are by Olympus Thread.

The sampler I bought only came with Japanese instructions so I needed the help of google translate to translate Japanese and after a search online I found some English instructions at Purl Soho and at a Threaded Needle. Olympus Thread also has some tips on their website. The text is mostly in Japanese but the step by step graphics are very clear.
The sampler is made up of a rectangular piece of fabric, one half is unprinted and one half is printed. You can either separate the two halves and stitch the design on the printed half and use the unprinted half to make the back of a cushion or something. For a more authentic look, you fold the unprinted half over the back of the printed half and stitch through both layers of fabric.
I went for the 2nd option. I pinned both pieces of Fabric together and first stitched the outline so I could remove the pins.
As you really should stitch Sashiko in your hand your than in a hoop or on a frame it is really difficult to stop the fabric from puckering when stitching. It is therefore recommended to leave long tails on the back when starting and finishing so you have room to remove the puckering. It also advisable to leave a bit of thread on the back when turning sharp corners. Although it is advisable to avoid sharp corners entirely. Because of the tendency of the fabric to pucker you need to look at the design a whole different way to other types of embroidery. You don’t stitch elements in one go but you need to try and stitch as many straight lines as possible and to avoid corners. As you can see from the centre of the design I stitched it is very difficult to stitch small circles without any puckering. I have tried smoothing out the fabric and loosening the thread but I couldn’t get it any neater than this.

I started off stitching the design in a white but I quickly decided that it wasn’t striking enough and restitched parts of the birds and the flowers in green. I think this design choice worked really well, but it would have been even better with a third colour, but I hadn’t bought any additional colours. So that is a lesson for next time. I like muted tones but you do need an accent colour to make it work.

When I finished stitched I tried to remove as much of the puckering as I could and weave in the loose ends on the back. I put in a few markers on the corners of the design before washing as the lines would come out. I intend to make this sampler into a cushion with either a plain fabric or another Sashiko design on the back. After the fabric had dried I ironed it. It is very important that you don’t iron the fabric before washing out the design lines as they might not come out after!
I really enjoyed stitching this design, even though I had to get used to stitching without a hoop in the beginning and keeping the tension correct. It is a very mindful craft since all the stitches are printed on the sampler and there is really only one stitch to do. It is also a very mobile craft as you only need the fabric, threads, needles and scissors. It is ideal for on holiday or on the go. I will definitely buy a few more samplers and different colour threads so I can practise some more before stitching my own Sashiko design.

it’s lovely. I like sashiko. I started a sampler around christmas (same company I think), and now I can’t find it!
LikeLiked by 1 person
Thank you! That is a shame, but a recognizable problem for many I think!
LikeLike
Very interesting, thank you for sharing! It’s a lovely design, but I think it does need a boost in colour as you’ve suggested. I can’t imagine stitching without the fabric taut these days, so well done! Such a simple but effective stitch!
LikeLiked by 1 person
Thank you Catherine! I am just glad I picked up the green at the show, as it would have looked terrible without it! I just should have picked an even larger variety but that is a learning curve. So glad I am doing the design class at the RSN! I should be far braver with my choices but I just really like pastels!
LikeLiked by 1 person
Very good job. I like your color choices. Have you decided how you will finish it? I’ve avoided finishing mine because then I’d have to figure out the finishing lol
LikeLiked by 1 person
Thank you Dima! I will make it in a pillow. I have ordered a few other samplers (as I enjoyed stitching it so much) so I will use another one as the other side of the cushion. I think I will use some piping on the seam to make the cushion even nicer.
LikeLike
Thank you for sharing this interesting embroidery technique Marlous!
LikeLiked by 1 person
Glad you enjoyed reading it Jessica! 😃
LikeLike
It’s a charming design, but I do see what you mean about needing an accent colour. With the classic white-on-indigo, you get all the accent you need from the difference in tone between light and dark, When you have a more muted palette with closer tones, it needs a little more help…!
LikeLiked by 1 person
Yes, but at least I have learned that while stitching this small piece. 😃 I have already put an order in for a larger variety of colours!
LikeLiked by 1 person
This is something new to me – it was really interesting to read about. Thank you.
LikeLiked by 1 person
Glad you enjoyed reading it! 😃
LikeLike
I think your choice of color and design is lovely. I didn’t know all this information about sashiko. Thanks for sharing, as I found it very interesting. Love the simplicity of it. Perhaps that is why I like Boutis so much.
LikeLiked by 1 person
Thank you! Glad you enjoyed reading it! Because I stitched the two layers of fabric together they started to puff up a little. I thought it actually started to look like boutis a little bit! When stitching a Sashiko with less space between the lines you could probably do a Sashiko and Boutis design in one!
LikeLiked by 1 person