In October 2018 I started the third module of the Royal School of Needlework Certificate course. After previously having completed the Jacobean Crewelwork and Canvaswork module, it was now time to try my hand at Silk Shading.
It was really difficult to pick a suitable photograph of a flower. The RSN brief sets many do’s and don’ts and even though I tried photographing flowers I could never get a suitable shot. As my dad knows a lot of flowers I asked him to help me out finding something suitable and he managed to find quite a few of which the anemone picture below was the best of all because of the angle the photograph was taken at, the colour and the size of the turnovers.

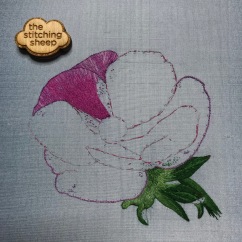
After simplifying the petals and leaves to make sure there are no really thin edges, I attached the silk to the calico I had already framed up, and pricked, pounced and painted on the design. At the end of the second day, I tried long and short stitches on the side before starting for real on the petal that was the furthest back and on the stem. During the two remaining days in my October break, I started another petal and did a few leaves.
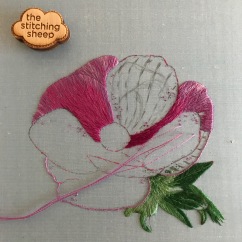
In February 2019 I returned to the RSN for two lessons. In the meantime, I had completed all of the leaves and the back petals at home.
In class, I got advice on the remaining petals and the centre and completed some more petals.
I completed the rest of the design at home finishing with the centre and the surrounding bullions.
When I returned in May 2019 for my final two lessons the tutor pointed out the missed stitches and I filled those in before taking it off the frame and mounting my design.
Colours
I have found that photographing silk shading is really difficult as the colours (especially of the silk) turn out really different from the actual colours. To give you an idea of the actual colours, these are the colours I have used:
Stranded cotton:
- Leaves: 358, 269, 246, 244, 243, 242, 208 (all Anchor)
- Petals: 815, 718, 3607, 554, 819 (all DMC) and 98, 97, 103 (all Anchor)
- Centre: 939, 29, 161, 15, 14 (all DMC) and 213 (Anchor)
Silk: HA 122 Ice Blue Indian Silk Dupion by the Silk Route
What I learned
I have found silk shading the most difficult technique so far. It really took time and a lot of encouragement from the tutors to get going. However, I found that once I got going I really got into the swing of things. I found it really tricky to keep the length of stitches random but not to long and not too short, to make sure the shading is correct and not stripy, to keep the edges smooth all at the same time whilst this technique feels best when you are not thinking about it and just going for it (music really helps, and if you are not tea-total like me, alcohol apparently helps too ;-)).
When stitching a petal I found it really helpful to only stitch the very first outside row as a row to get a smooth edge. All of the other rows I stitched more randomly to improve shading and to prevent any a stripes.
I also decided to stitch the outside row of stamens before stitching the centre so I had a little of bit of space left where I could start and finish a stitch without constantly having to turn my frame over. I then stitch two sides of the centre before adding in more bullions, before stitching the final side and remainder of the bullions.
As a few of the stranded cotton colours I used were quite similar I used several of my magnetic needle minders at the same time and always parked the same colour on the same minder so I could keep track of which one was which.
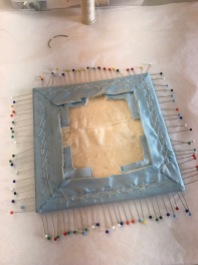
I found the silk I used really difficult to work with. The light blue colour is achieved by having a white weave and a dark blue weft. If you have an area with dense stitching the weave and weft move slightly creating either a white or dark blue patch on the fabric. This is particularly noticeable around the leaves, around the corners of the mount board and around the side of the board where the pinpricks were. However, there was nothing I really could do about it. I noted it on my self-assessment form and hopefully the assessors will be lenient about it as I can’t think of a way I could have prevented it from happening.
Results
It will be a while before I get my results and fingers crossed that they are any good. Next, I will get ahead with some more prep work for my final certificate module: goldwork. I have already attached the silk and painted on the design. I will be able to attach the felt at home before starting the summer intensive course on the 5th of August so that should give me a head start, which hopefully enables me to complete the stitching in the two weeks.


Wow, what a good job! I am dreading this module……I will certainly take heed of your experience regarding choice of silk. Well done, I look forward to reading how your assessment goes. Thank you for taking the time to share your experience.
LikeLiked by 1 person
Thank you!!! I had never thought about the weave of the silk and that it could be a problem, so I am glas I have at least warned some people about it now! I will share the details of the assessment as soon as I receive them. Fingers crossed it will be ok!
LikeLike
Well done Marlous, you have done a wonderful job. It is such a tricky technique to get into, but like you, I found the more I worked the technique, the better I got. I’ll be interested to know what the assessor’s comments are if you share them, as I always found them useful. It’s a shame about the fabric, but I guess that is all part of the learning process.
LikeLiked by 1 person
Thank you Catherine! I will share the assessor’s comments when they arrive as hopefully other can learn from them too. The fabric was a real pain but hopefully writing about it on the form will prevent really harsh marks!
LikeLiked by 1 person
In my experience they never read your comments but hopefully they have changed their ways and you can learn how to deal with it next time!
LikeLiked by 1 person
🤞2 of the tutors mentioned that I should put it in and they are both assessors. They said they always read them.
LikeLiked by 1 person
Hij is echt heel erg mooi geworden Marlous.
Wat een werk is dit geweest.
Dit miet vast een heel hoog cijfer worden.
LikeLiked by 1 person
Dankjewel Will! Ik hoop het!
LikeLike
Hi Marlous, Thanks for this really great summary of your experiences on the Silk Shading module. Wonderful to see the side by side comparison and the progress photos. I have noted the issues you encountered when using the silk fabric with the different coloured warp and weft threads – this is really useful to remember when doing a piece with intense stitching such as Silk Shading. So now on to the Goldwork Module for you. This was my favourite of all four modules. I know you are already working on your design, and I am sure it will be lovely. Congratulations on the finshed Silk Shading. I will be back in the U.K from mid August- are you around then? Best wishes, Sally.
LikeLiked by 1 person
Dear Sally, thank you so much for your comments and glad you have found my post usefull. I am really looking forward to the Goldwork module and I am glad I have a bit of time before it starts to practise the technique in a kit. I will be around until the 17th of August! Hopefully we will have a chance to meet!
LikeLike
Marlous, your anemone is spectacular!!! The comparison shot at the bottom of the post says it all. You did such a beautiful job! It’s too bad about the fabric, I didn’t know that could happen either, but I’ll make note of it for the future (I’ve always wanted to try silk dupion).
I’m trying to teach myself silk shading/needlepainting too and it’s so HARD! It seems very much to be an instinctual process as you said and I find it hard to be so free with the stitches; and the smooth blending is difficult for me, at least so far. It has been so interesting watching you stitch this and I can’t wait to see what you do with your Goldwork course! Best of luck with your RSN assessment, I’m sure you’ll do great ☘❤
LikeLiked by 1 person
Thank you so much for your lovely comments Aurelia! It is very much instinctual, just get all of your needles threaded with the different colours you need for a petal and just go for it! Draw some design lines on the fabric to guide you. Do the first row in one go and then just let your needle guide you to the correct colour for the next stitches.
LikeLike
It looks pretty good to me! Make sure that you keep notes about the things you’ve learnt through the modules about the fabrics you’ve worked on. Then when you come to do other things, without the guidance of your tutors, you’ll have your earlier self at your elbow to remind you of little details like the effect of the dark warp/light weft combination.
LikeLiked by 1 person
Thank you Rachel! Blog writting really works for keeping track too. Otherwise I would have forgotten bits I have learned or lost the pieces of paper I had written it on. At least my blog inspires me to write about my experiences, for others but also as a reminder for myself!
LikeLiked by 1 person
Likewise. I’ve written up ideas that I’d like to do but haven’t got around to, in hopes that I will get around to them!
LikeLiked by 1 person
Helder en duidelijk verhaal. Mooi met alle voortgangsfoto’s. Benieuwd naar de beoordeling. Mama
LikeLiked by 1 person
Dankjewel Mama, ik ook, helaas moet ik nog wel even wachten.
LikeLike
I can only imagine the amount of time and thought invested. It’s lovely.
LikeLiked by 1 person
Thank you Karen! Lots of people ask me how much stitching time was involved but I didn’t keep track. In addition to the 8 classes I think it took at least that amount in stitching days.
LikeLike