
If organising was a hobby, it probably would be one of mine. I love making labels to organise things and try out different storage solutions. The problem with a growing stash of needlecraft items is that you quickly outgrow the solutions you have previously used or that they don’t seem to fit the bill anymore.
I always fancied having one storage unit that houses all of my embroidery threads, beads, buttons etc. Since I am not one for making an entirely new storage unit myself I wanted to repurpose an old piece of furniture.
Old shop storage units, apothecary cabinets or printer’s cabinets are ideal for repurposing since they already have a lot of drawers, divides or sections. However, finding the perfect unit was quite a challenge. Some are already restored and cost far too much money and some are so worn out that it would take too much effort to do up.
I narrowed my search for a printer’s cabinet as the drawers of those type of cabinet are very shallow and therefore create a perfect overview of your stock. I also wanted a unit that had different drawer sizes for different items and one that is large enough to have space to grow into but not too large so it wouldn’t fit into our house.
After a couple of months, I found the perfect cabinet on Marktplaats (a Dutch website similar to eBay) and the unit was being offered for sale by Fleur’s Depot a vintage interior shop in Rotterdam. I e-mailed the owner and arranged for her to reserve the item until I could view it on a Saturday. The shop (even though in a residential street) is huge and housed in an old embroidery factory. It sells superb industrial and rustic furniture anaccessories. When I spotted ‘my’ cabinet, I was immediately sold despite it needed much more cleaning than I had previously anticipated. Fortunately, my boyfriend had suggested hiring a trailer just in case I liked it so we could take it home straight away.

When I got it home it slowly started to sink in how much work it would be. Before I could start to modify the drawers to fit my embroidery stash I first had to clean the inside as otherwise it would have stained my stash. Printer’s use lead, so much of the dust and dirt on the inside is made up of lead particles which are poisonous in large quantities. I decided to vacuum the inside first to get rid of most of the dirt and dust as quickly as possible.
Next I used a craft knife to cut out all of the paper inserts which were sitting at the bottom of each drawer as they were badly stained and dirty. I then used St Marc’s cleaner and a cloth and sponge to clean the drawers as much as possible.


After the drawers were as clean as possible I got my threads and other embroidery supplies out and decided how to modify the drawer inserts to fit my supplies. I used sticky tape to mark the dividers that needed removing. As all types of thread are different, every drawer has its unique configuration depending on the length and width of the items it needs to store. Only the drawers for the smallest items (beads, buttons etc.) have kept their original configuration.

The way the drawers were constructed meant that you could use a pair of pliers to wiggle the vertical dividers out-of-the-way. The horizontal once needed cutting with a Dremel circular saw. Sometimes I even add new dividers from some spare wood. After the drawers were modified I sanded them with a rough sandpaper (by hand and with my Dremel) and cleaned them again using St Marc’s.
As the wood used was not consistent throughout the cabinet I decided to use some smoked oak wood stain. However, that made the inside of the drawers very dark so I opted for some transparent wood stain on the remainder of the drawers. After staining I used a fine sandpaper to create a smooth finish and cleaned the drawers again using St Marc’s.
The smaller drawers have small wooden slats in them that allow you to modify the drawers instantly. Two of the drawers I have set up to fit my bead storage solutions containers (available from Amazon) and two other drawers to fit my sewing thread spools. I had to replace the bottom of one of the small drawers with a new piece of plywood as the original bottom had warped so much it became to difficult to pull the drawer out.
For the outside of the cabinet, I had to wait for a weekend of nice weather. When it arrived I removed all of the drawers and took the cabinet outside. I sanded the whole thing, cleaned it and applied a coat of smoked oak wood stain. I then removed the drawer handles and label holders and sanded the drawer-fronts, cleaned and stained them too. I decided that I needed to have the top of the cabinet and drawer fronts look a bit darker so after lightly sanding I applied two more coats of wood stain.
When all of the drawers were out, were also able to put the cabinet on its side to be able to clean the inside of the cabinet itself. There were many years of dirt and grime on the inside too, and even some lost receipts and pencil ends!


I wanted to replace the handles and label-holders as they looked rather worse for wear. I found some really nice handles at 19toen, a vintage shop in Sommelsdijk. Even not been to the actual brick and mortar shop but their online shop has lots of vintage and new (but vintage looking) items. The staff was really friendly and helpful and I received my parcel very quickly. I really liked the green ones they were selling but I thought it would be too much to have all (28) handles in green so I decided to have most of them black with 4 green ones.
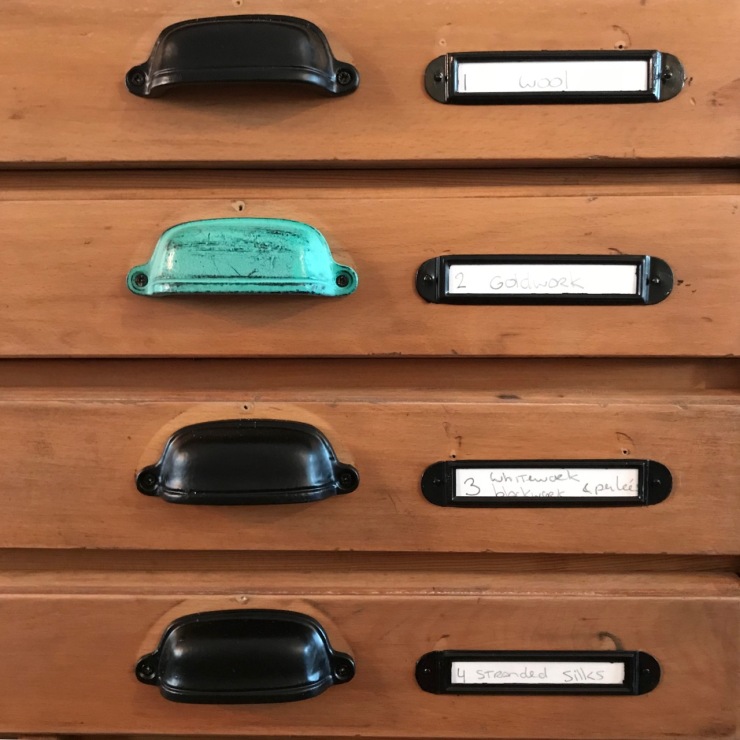
I couldn’t find any label holders in black that were big enough so I bought 14 new ones from 19toen in nickel and spray-painted them black. For the smaller drawers, I have repurposed the original label holders after spray painting them too.
To add a little bit of extra interest to the inside of the drawers too I bought some Tim Holtz design tape from Meer Leuks. These design feature vintage images of rulers, squared paper, train tickets, notebooks etc. I have already used some tape in the button- and ribbon drawers

My cabinet is still not entirely finished as I still need to do the inside of two drawers. I am also waiting on some acid-free tissue paper to put in the drawers which will house my embroidery threads to prevent any stains on the threads. I also need to make some nice labels to put in the label drawers. However, I really wanted to share the result so far as I am so happy with it. The outside is done (apart from new labels) and some drawers are filled already so they will give you some idea of what my finished cabinet will look like. In a next blog post, I will give a (video) tour around my new cabinet once it is completely done and filled.


It has already taken me four weeks to work on my cabinet during the evenings after work and at the weekend and I did think it wasn’t going quick enough. In addition, my craft room is a big mess with bits all over the place. However, now I have seen what it starting to look like finished I am really happy I have put in so much effort as it will be the best cabinet ever and a piece of furniture I can enjoy and use for many years to come!

Great work Marlous! It looks like it will be a great way to store everything neatly away. I hope the inserts are able to be moved around so you can continue to adjust as your collection changes and grows. I look forward to your video tour!
LikeLiked by 1 person
Thank you Catherine! I can’t wait to see the rest of the drawers filled too. Two drawers are still empty (and have nothing planned for them) so I can still change their layout. I can also change the layout of the ones I have done as I have kept many of the original dividers. Moreover, the drawers are interchangeable so I can move them up or down the cabinet if I need to.
LikeLiked by 1 person
I doubt I’d have the patience to do what you’ve done to this cabinet. It’s splendid and I wish you many years of enjoyment in its use. I’m positively green with envy!
LikeLiked by 1 person
Thank you so much Mrs G! I did indeed require a lot of commitment, but I am so glad I persevered!
LikeLike
Je hebt weer een knap stukje werk afgeleverd. Veel plezier ervan.
LikeLiked by 1 person
Dankjewel Mama!
LikeLike
Your printer’s cabinet is an amazing find, but your restoration and renovation is extraordinary! I have always loved furniture like this, full of small nooks and crannies, and the way you’ve adapted the drawers for your embroidery supplies is genius 😍 I’m as green as your verdigris drawer pulls with envy LOL
LikeLiked by 1 person
Thank you Aurelia for your lovely comments!!! I tried my best in cleaning and restoring it the best I could (without any previous experience) whilst keeping the vintage charm of the piece intact.
LikeLike
It looks wonderful. I always wanted to get one of these drawers for my embroidery stash. Now I know what I’ll be in for when I get one 😉
LikeLiked by 1 person
Thank you Dima! Yes be prepared. Love that old furniture has so much character and history to it, but it a lot more work than something flat packed straight of the shelves!
LikeLike
Well done – it is a real triumph!
LikeLiked by 1 person
Thank you! It feels like it! Strange that I can have plenty of patience for embroidery but that doing up a cabinet can’t go quick enough!
LikeLiked by 1 person
I think patience is a reflection of the degree of interest you have in it!
LikeLiked by 1 person
You might have a point there. I don’t particularly like doing up things, I just want to get a result. I really like the process of doing embroidery as well as the end result!
LikeLiked by 1 person
A fabulous find and brilliant repurposing.
LikeLiked by 1 person
I was very lucky to find this one I think!
LikeLiked by 1 person