As I mentioned in my previous post I was quite nervous about going back to the RSN as I completed most of my project at home and I didn’t really know whether the tutors would be happy with my progress. That is also why I booked my final three days spread out over the week that I was staying so I could always do some more homework or book any extra classes if lots of unstitching had to be done.
When I arrived on Saturday the 3rd of February my class was actually in the RSN Library rather than the C&D Classroom. The class had originally been fully booked but when there were enough people (5) on the waitinglist they decided to release extra spaces. I was lucky enough to grab one of those. It was actually really nice being in the library, as it is a very light and spacious room and with only five of us it was very relaxed and quiet. Our tutor for the day was Heather Lewis.
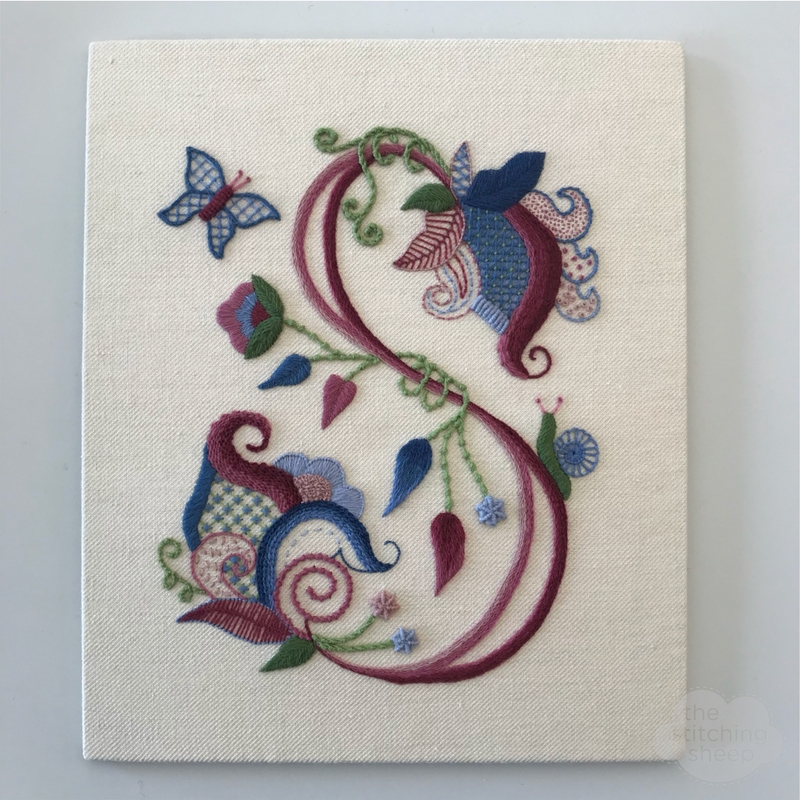
Because I was the first one there Heather came to see me first and quickly put me at ease and said I had done really well at home and that I would be able to finish my embroidery that day and make a start on the mounting. Heather made some suggestions for stitches and I ended up adding a few more to the long list of different stitches I already had.
- Pistil stitch for the feelers of the butterfly and snail
- Couching as an outline of the two leaves at the top of my design
- Running stitches in the bottom flower
The remaining open spaces I filled with different densities and thicknesses of French knots and seeding stitches.

Next I decided on the final size of my embroidery so I could cut my board. I ended up going slightly larger than normal so there is room for a mount when I get my embroidery framed. I also decided to slightly off-set my design horizontally as because of the way the design is formed it looks much better than when being set exactly in the centre.
It is actually really difficult to cut your board exactly square with the right dimension (30 cm by 25 cm) and it did take me two goes to get it right. Next I had to cover the board with calico so I can stitch my embroidery to it in the next stage. You have to stretch and glue the callico really taut which was really difficult but fortunately Heather was on hand to give me some tips.
Before we broke up Heather said my embroidery look good and finished so I could take it of the frame at home ready for mounting on Tuesday. However, I still found it rather a scary thing to do by myself so I left it until the start of class on Tuesday after a second opinion from the Tuesday tutors Sarah Meanwell and Sara Dennis. They agreed with Heather and my embroidery came off the frame.

The next part was the most difficult, stretching the embroidery taut on the board and getting it exactly on the grain. It was a real workout as you need to pull really hard and it took me a long time to get it right. Only just after lunch I got the thumbs up from both tutors that I could starting attaching my embroidery to the calico and by which time I had three plasters on my fingers and no feeling in my fingers or my arms.

For the next step it was really fortunately that Sara Dennis was in today as she was able to show me the lefthanded-way to herringbone my fabric to the calico. Lefthanders go around clockwise whereas righthanders go anti-clockwise. Apparently herringbone is a really difficult stitch to explain the other way around. She also explained how to mitre the corners and by the end of class I had done three sides and three corners and the tutors were really happy with my progress although I felt I had accomplished very little on that day.

I decided to arrive early for class on Wednesday so I could finish the herringbone stitches before the tutors (Rachel Doyle and Jacqui McDonald) arrived. Rachel checked my herringbone and said I needed to pull the stitches a bit more tauter which I did when Rachel found me a piece of sateen to cover the back of the board. She showed me how to pin the sateen to the board and stitch them together so you would not see any stitches.


After the sateen was attached I removed all of the remaining pins, removed the pinholes by rubbing the holes with my mellor, attached my name label to the back and removed any remaining fluff from the front of my work with a pair of tweezers and some cellotape.
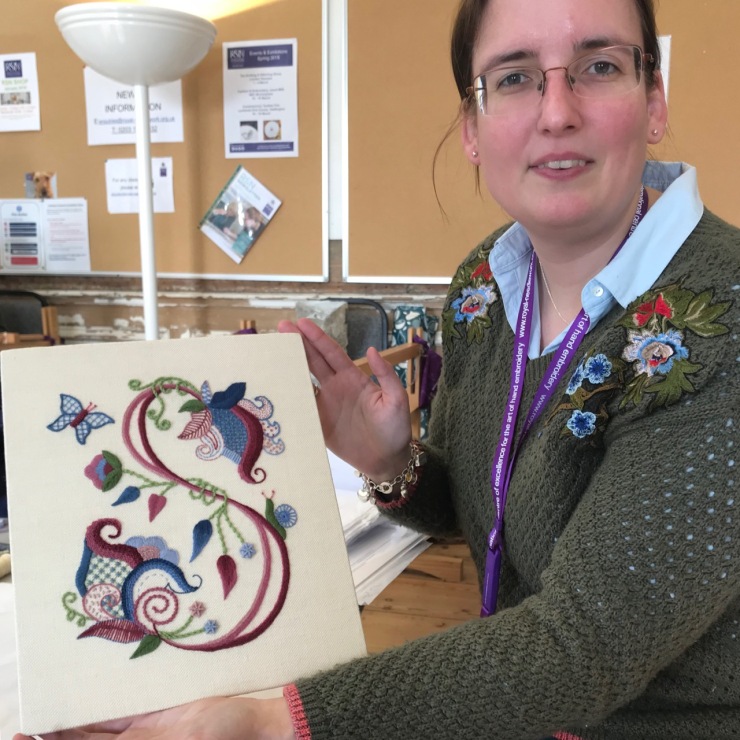
I took some photographs and just before lunch my embroidery and supporting documentation was put in a box, registered and handed in. I did find that really scary, as I couldn’t do anything more to it and I just have to wait for my marks now.
My embroidery will be marked during the Easter session so hopefully I will find out my marks shortly after! A nervous time awaits!

I loved reading about your adventures in that beautiful place! I can’t wait to hear about your “critique.” I’m sure you’ll do well. I live in California and I so envy your experience. I hope you’ll continue writing about every detail!
Thank you.
LikeLiked by 1 person
Thank you Barbara! I am glad you enjoyed reading it! I will definitely be sharing the critique once it arrives! I will be posting about my next modules too. However, I am doing the next one as a summer intensive so I am not sure how much time I will have to blog as I have been hearing it is very Intensive with a capital I. I will definitely be sharing WIP pictures though throughout the two weeks I am there on The Stitching Sheep’s social media accounts.
LikeLike
This is splendid Marlous, and I like the way you incorporated a subtle double S into the design for Stitching Sheep! Was that deliberate?
LikeLiked by 1 person
Thank you Mrs G! It actually wasn’t, believe it or not. I didn’t want the traditional hillocks and tree, but wanted a less static design and went for the flowing branch. When another student was stitching a sheep in her design, I felt a bit silly that I didn’t think to have a sheep in mine, but then I realised I already had a double S!
LikeLiked by 1 person
it is beautiful! You’ve done an amazing job!
LikeLiked by 1 person
Thank you so much for your lovely comments!
LikeLike
Well done! I saw the pictures on Instagram but loved reading about all the details. I’ve done this only once before but I must not have done it right if my fingers didn’t hurt like yours did. I will have to give it another go one day 🙂
LikeLiked by 1 person
Thank you for your lovely comments Dima!!! It is really nice to hear you have enjoyed reading my blog even though you had seen the pictures already! I can’t imagine mounting my embroidery without my arms or fingers hurting unless I gain lots of muscles in my arms and thick skin on my fingers. 😉However, I do hope it becomes easier with practise.
LikeLike
Well done Marlous, it is looking really good.
LikeLiked by 1 person
Thank you Sally!!!
LikeLike
Oh, well done indeed! I’ve noticed all the RSN students shred their hands doing the mounting – it sounds like an embroiderer’s version of wrestling!
LikeLiked by 1 person
Thank you! My arms for sure felt like having wrestled the next day!
LikeLiked by 1 person
Looks fantastic, good luck
LikeLiked by 1 person
Thank you!!!
LikeLike
I love your design and it is beautifully finished. I too am left handed and I have never done the finishing off as complicated as yours. I have recently managed to do the lacing reasonably tight but I only had to do the second layer my tutor did the first!
LikeLiked by 1 person
Thank you Margaret! It was my first time doing the mounting and I found it quite a challenge. Glad to have some experience of it now. Even though it doesn’t make a difference being left handed for many stitches but it does for some and it does help to have a left handed tutors for those!
LikeLike
Looks fantastic and it was interesting to find out about the mounting process as this is something that I am hoping to do very soon too. Well done you and good luck for the assessment.
LikeLiked by 1 person
Thank you! Glad to hear you find my post useful! The mounting does take quite a bit of time so do make sure you have left yourself enough time as it pays not having to rush it!
LikeLiked by 1 person
It’s so beautiful! Hard work and talent. Needless to say you’ll get top marks. I’m sure of it.
LikeLiked by 1 person
Thank you so much for your lovely comments Cristina! I hope your prediction comes true!
LikeLike
Seeing your works and reading your lines, I cannot help noticing your talent and great will that I really admire. So you deserve the best reward possible.
LikeLiked by 1 person
Thank you ☺️
LikeLike
It looks simply beautful!
Thanks so much for making this blog – I’m thinking about taking the Certificate and all the detail you put in the posts is really helping me get a good idea of what’s involved! (Have to say, the assessment sounds rather scary!).
Susannah
LikeLiked by 1 person
Thank you Susannah! It is really nice to hear that you have found my blog useful! As it will be my first assessment I am rather scared about it too but I will blog about it when I get the result. Have you seen Hillview Embroidery’s blog too? She already a bit further along with the certificate and her blog also has some great detail and information about the certificate.
LikeLike
Hi. Yes, I’ve been looking at the Hillview blog too – they’re both really helpful!
Have you decided which embroidery technique you’ll be tackling next?!
LikeLiked by 1 person
Yes, I will doing Canvaswork next. I have already talked about the possible design with the tutors last week so I can do a bit of practising at home as my summer intensive course at the RSN won’t start until July.
LikeLike