
For the certificate and diploma courses at the Royal School of Needlework, you are required to use a slate frame. The easiest way to embroider using a slate frame is to rest it on a pair of trestles. It was the first time I actually worked like that having previously only used seat frames or no-sew roller frames on a stitchmaster floorstand.
It did take a bit of getting used to, but I quickly realised I needed a pair of trestles at home to be able to stitch properly. However, a proper pair of trestles costs between 300 and 500 pounds plus postage which I think is just too much money. I could have opted to rest one side on my desk and the other on the back of the chair but I wanted more flexibility in height and angle.
The third option was to make my own. I looked at pictures of various different embroidery trestles and designed mine. Even though I would have liked to use proper wood, it is significantly cheaper and easier to use timber from my local DIY store. To make the trestles sturdy and stable I had to change my design as I went along. For instance, I wanted to make the feet removable but realised it would be very difficult to create a perfect fit so it would stand up properly. I, therefore, decided to attach the feet to the frame instead.
What do you need:
- aluminium or stainless steel rod of 5 mm diameter. Minimum length 28 cm
- 1 m chain of a size to match the aluminium rod
- 4 eye screws/screw eye (12*3.0mm)
- 48 screws (25 cm, 3,5 mm diameter)
- 16 felt cushions of 1,5 cm diameter
- 4 small keyrings
- paint in a colour of your choice
- 7 lengths (270 cm each) of 45 mm * 15 mm timber. I bought timber that already had a base-coat so I didn’t need to apply one myself. Get your DIY stores to saw the timber to the required lengths for you. It is quicker and more likely to be straight unless you have got a fancy saw at home. You need:
- 10 pieces of 90 cm long (8 for the vertical elements and 2 for the moving bars)
- 4 pieces of 85 cm long (for the horizontal elements)
- 8 pieces of 40 cm long (for the feet)
- 4 pieces of 45 cm long (to fill the stand between both horizontal elements)
- 4 pieces of 3 cm long (to secure the tops of the stands)
- 4 pieces of 5,5 cm long (to fill the bottom part of the stand)
Including a full tin of paint (which you will not use up), the materials cost me about 60 euros (about 50 GB pounds, 90 AUS dollars, 70 US dollars).
Step 1
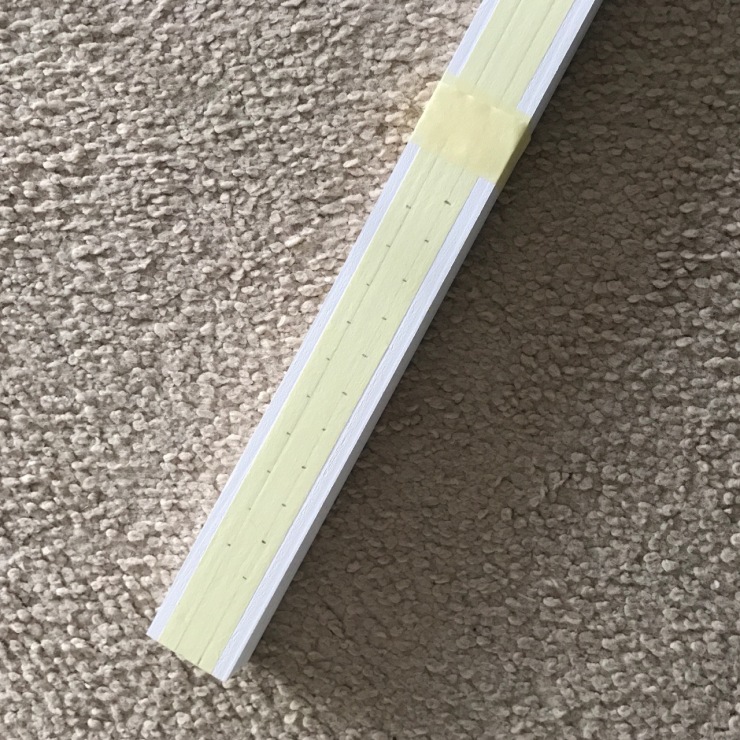
Take 8 of the 90 cm long pieces and tape them together (45 mm sides together) two by two using masking tape. Put a piece of 30 cm masking tape from one end down. Draw two parallel lines down this tape about 1,5 cm from each edge and 1,5 cm apart. Starting 5 cm from the top mark every 1 cm alternating between each line (see picture). Place the last dot at 25 cm from the top. You should have placed 21 dots. Mark the three other pairs in the same way.
Using a 6 mm drill, drill holes on each of the points you have marked. It is easiest to place your drill in a stand so you know the holes you drill are perfectly vertical. Use a file or some sandpaper to remove any splinters.
Step 2
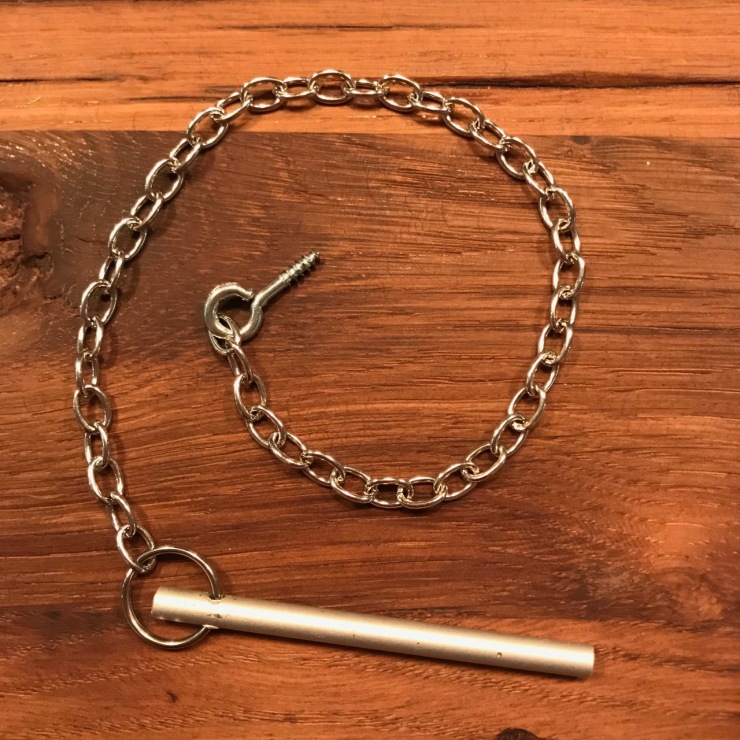
Cut the 5 mm aluminium / stainless steel rod in 7 cm pieces and use a 1,5 mm drill to drill a hole about 1 cm from one end. Thread the piece on a small keyring.
Cut the 1 m length of chain in 4 equal length pieces. Thread the keyring with the rod on one end and the eye of the screw on the other end of the chain.
Step 3
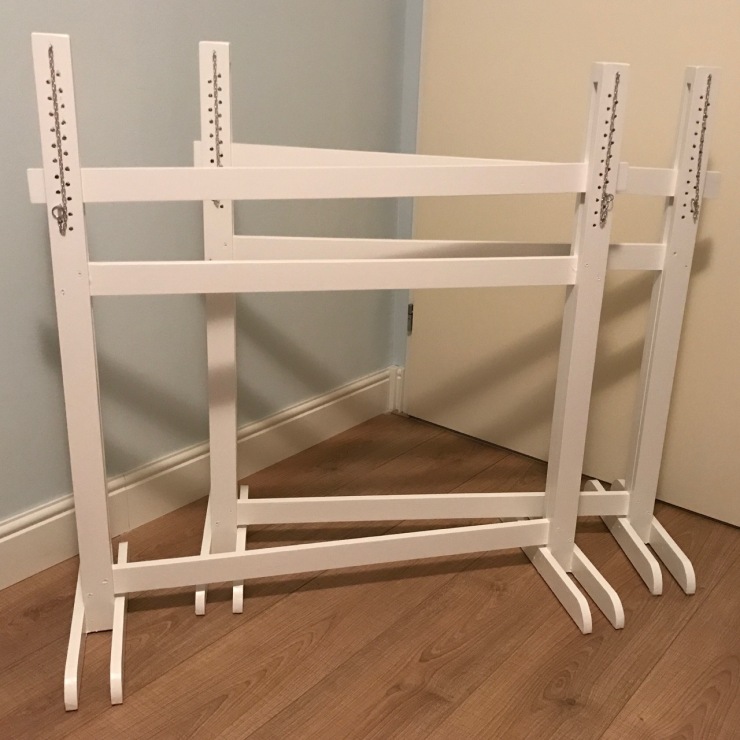
Take a look at the pictures below to check the placement of the various pieces as it is difficult to describe in words which pieces to put where! But I will try and give it a go:
Take two pairs of 90 cm long pieces with the holes drilled into them. Remove the tape and put one of each down so the holes are mirrored. Glue a 5,5 cm piece at the bottom of each piece. Take an 85 cm piece and glue it directly above the 5,5 pieces to connect both 90 cm pieces. Make sure that the 85 cm and 90 cm pieces are at right angles. Glue a 45 cm piece above that and stick at second 85 cm piece directly above. Glue a 3 cm piece at the top of the stand. Press the pieces together and let the glue dry a little bit before glueing the remaining 2 90 cm pieces on top. Ensure the holes are aligned by sticking the rods in the holes and securing the pieces together using clamps. Let the glue dry overnight. Make the second trestle in the same way.


Step 4
Draw a semi-circle on a piece of paper and cut it out. Draw the quarter circle on each end of the 40 cm pieces. Using a jigsaw cut out the feet. Mark the centre of each foot and draw a line on either side 2,25 cm away. Glue this central part of the feet to the bottom of the stand. Secure using clamps and leave to dry overnight. Once the glue has set properly remove the clamps and secure the feet using two screws. Pop some felt cushioning to the bottom of the feet.


Step 5
Mark a point 1,5 cm from the top of the trestle in the centre of the pole where the chain will be attached, and pre-drill this hole.
Sand the entire stand. Using a roller and a brush paint the entire stand in the colour of your choice.
Slide in the moving bars and pop in the rods to secure them.
Screw the chain in place at the top of the stand in the marked hole.
Finished!

Hi there
My daughter is taking a Diploma in embroidery and needed a trestle but could not afford £500 listed price.
I followed your instructions using Tulip wood. Easy to follow. It took me 8 hours snd in total the materials cost £70.
They look very good.
Thank you!!
LikeLiked by 1 person
Dear John, thank you so much for your comments! So glad to hear you have find my instructions useful and that you were able to make your daughter a pair of trestles. I hope she will enjoy using them for her course.
LikeLike
I am just about to have a go making your trestles. After having them for a while, is there anything you would change before I start? Great instructions btw!
LikeLiked by 1 person
Great you are having a go! I am actually still really happy with them. There is nothing I would change. I use them a lot and they have held up to that test. Do share a picture of your finished trestles!
LikeLike
Thank you so much for this! Bought all the materials for 50 euros in Leroy Merlin (Spain) and a lovely friend made them from your instructions – Ikea could learn a thing or two from them, he said! Don’t know how to add a photo here but I have put one on Mary Corbet’s Needle’n’Thread community on Facebook.
LikeLiked by 1 person
That is brilliant Patti! I am so happy to read that someone has used my how-to! I don’t think you can share pictures in the comments, but could you share it on the Stitching Sheep’s facebook page too? I would love to see it. Please let the Needle’n’thread community know where to find the instructions! Thank you so much Patti!
LikeLike
I’m just about to start the RSN Certificate course. Thank you for these useful instructions on how to make a pair of trestles. Now I have an initial project to get started.
Your crewel work looks great. It is an inspiration as I commence the course.
LikeLiked by 1 person
Thank you Julian. Glad you have found my posts useful. Having a pair of trestles definitely makes stitching much easier and making your own saves so much money. Good luck with the certificate!
LikeLike
Well done indeed! I wish you many proud and happy hours stitching with them!
LikeLiked by 1 person
Thank you!!!
LikeLiked by 1 person
It would have been nice to have had a ‘how to’ before my other half set to and made my trestles. He did a good job, but it is hard to explain something to a third party.
LikeLiked by 1 person
I know, my boyfriend couldn’t imagine how they would turn out when I was working on them! He only understood how they worked when I put my slate frame on it and sat down at it! Fortunately my dad got it straight away so he could help me.
LikeLike
They look lovely – very professional.
LikeLiked by 1 person
Thank you!
LikeLike
Amazing! Well done. I have made do with a stand I had previously and it work well enough as I can still alter the height and angle. I think I will treat myself at the end of it all! I love your DIY skills. My brother is about the only one I know who could help me with this!
LikeLiked by 1 person
Thank you! I did have some help too though, as my dad has all the fancy gear. I couldn’t have done it all on my own. He did all the drilling, I marked everything, put the thing together, sanded and painted it.
LikeLiked by 1 person