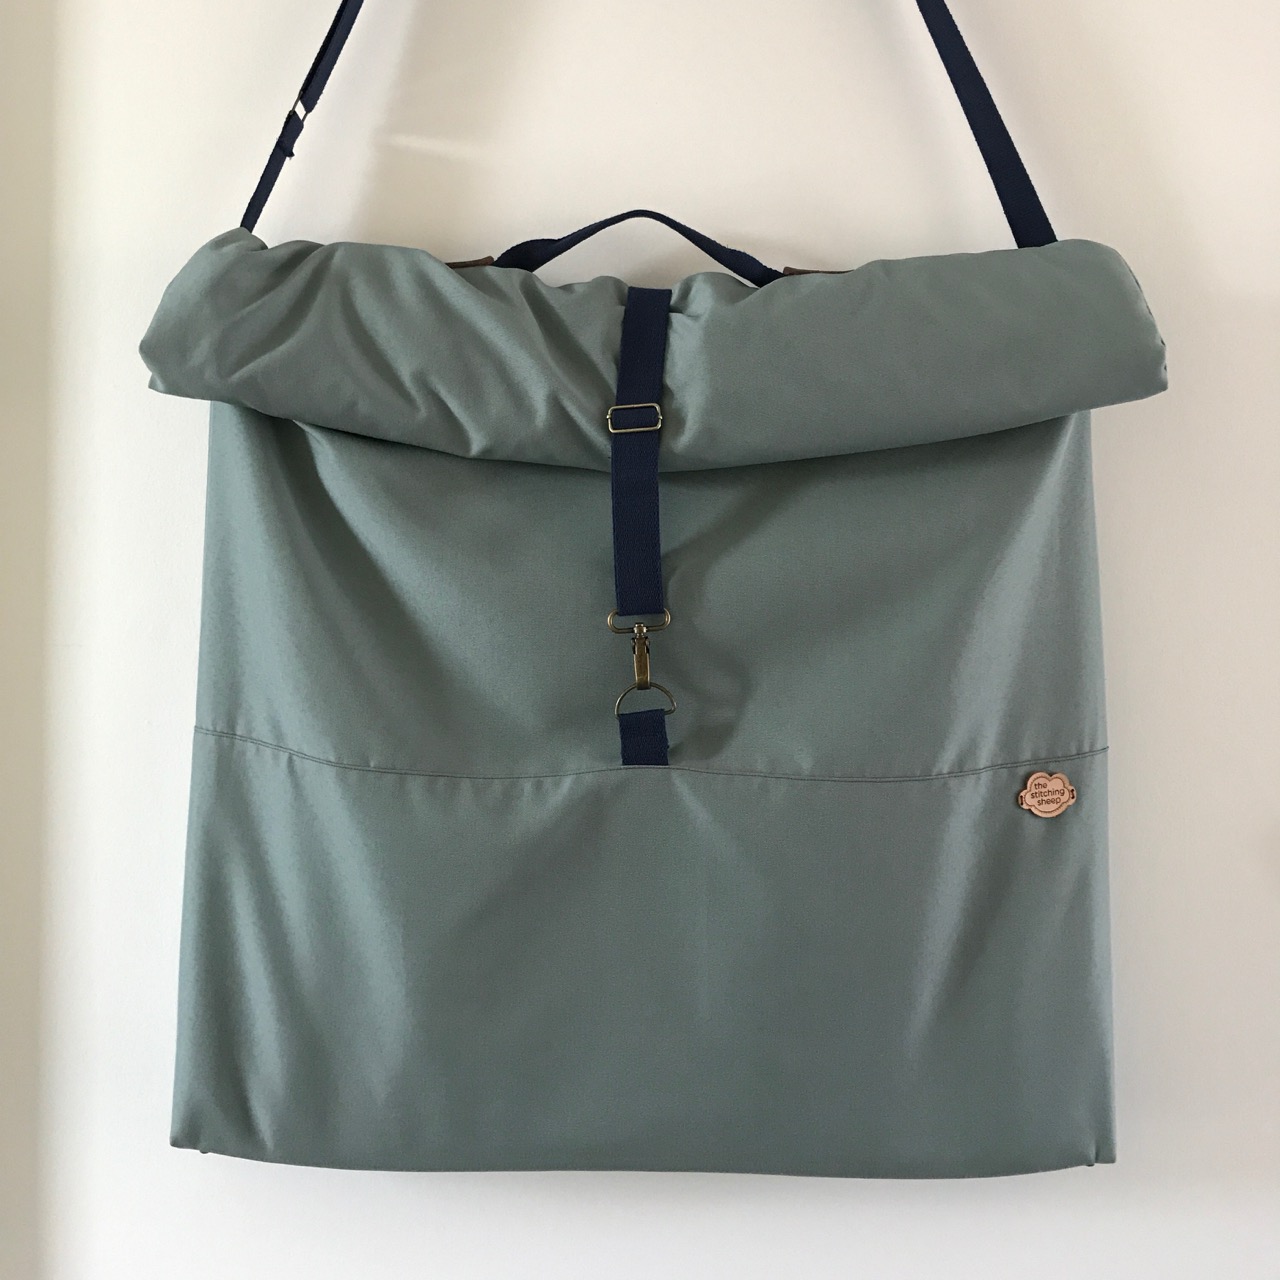
When looking for a slate frame bag to buy or for a pattern to make one myself I could only find one ready made, which the RSN sells, and one blog post by Sweet Fallen Angels who made her own. However, neither was one that suited my style or had the features I wanted. I wanted a bag that could be entirely closed to protect my embroidery from the weather and dirt. I wanted a shoulder-strap to keep my hands free and I wanted some padding to keep my embroidery safe.
Therefore, I decided to try and design and make one myself.
Online I had spotted many very fancy bag-patterns that I could scale to make it the right size for my frame but since I am a rather novice sewer I thought I better make something simple that would be fit for purpose rather than make something fancy that ended up looking horrible.
I thought I would try and write a how-to for those of you who want to make their own bag and might not know where to start or fear that it might be too complicated. If I can sew it so can you! It is my very first how-to so I am hoping I am explaining everything clearly. Please don’t hesitate to contact me if you do have any questions and I will try and help.
The bag I have made is for an 18-inch slate frame. Normally the RSN uses 24-inch frames but they recommend the 18-inch frame for those who need to travel with their frame. If you want to make a bag for a 24-inch frame using my how-to, add 15 cm to the width and the length of the front and the back panel. However, do check the fit when you have pinned the bag-pannels together before cutting and sewing.
You can, of course, use any fabric and any accessories you like but I have listed the ones I have used in case you are looking for something similar. I have provided hyperlinks to the shops (Textielstad and Stoffen.net) where I bought the items from. They are both Dutch shops but do deliver internationally. However, most of the items you will be able to buy from your local haberdashers as well.
What I have used:
- Outdoor sunproof canvas sea green (150 cm wide): 1 metre (1 bought 1 metre but got about 1,05 and used the complete piece)
- Tilda Wildgarden 3 (110 cm wide): 2 metres
- Vilene H640 Fusible Fleece (90 cm wide): 2 metres
- 2 Straps for bags 30 mm wide * 3 m navy blue (Prym 965188)
- Rectangle loop for bags brass (Prym 555306)
- D-ring brass (Prym 555242)
- 2 Adjustable buckles brass (Prym 615807)
- Snap hook brass (Prym 417907)
- Base nails brass (Prym 615901)
- Attaching pads brown (Prym 615751)
- Amann Mettler Seralon colours 1422, 1276 & 1214
- DMC stranded cotton 150
- Strong cotton tape brown 30 mm * 2,5 m
- Thick cardboard 75 cm * 6 cm
Lining
- Cut two panels measuring 102 cm high by 78 cm wide from the Tilda fabric and from the fusible fleeces. If your fabric is directional (like the fabric I used) make sure your panels face the same way.
- Iron the fusible fleece to the reverse of the fabric
- Pin both panels together and sew a U-shape measuring 75 cm wide and 100 cm high.
- Sew a boxed corner in both bottom corners by bring the bottom and side seam together and drawing a line of 6 cm at 90 degrees to the seam and sewing on that line. Before cutting the redundant piece of fabric and fleece check the corner has been stitched correctly by turning the bag inside out.
- Leave to one side


Outer bag
- To add interest and hide the end of the straps which close the bag I stitch an S-fold about 34 cm from the bottom edge. I used contrasting thread to stitch it. The S-fold has a 1 cm fold in the middle. Position two pieces of strap in the fold at the middle of the front and bag.
- Fold the piece of fabric right side together and sew together along the selvedge
- Sew a small (quarter inch will do) hem on the folded edge so both sides look from the outside like they have been stitched.
- Sew a 1 cm along the bottom edge
- Sew a 6 cm boxed corner in the bottom corners (same method as for the lining).
- Turn bag right side out


Bottom
- Make four holes in the thick piece of cardboard
- Pop the piece of cardboard in the bottom of the bag and secure using clips
- Use an awl to make holes in the fabric where the holes in the cardboard are
- Put some fabric glue around the holes to prevent fraying
- Pop in the base nails and secure on the inside with the supplied disc and fold the metal flaps.


Straps
- Measure 60 cm from the bottom corner along both side seams
- Attach straps (1 piece of 15 cm, and 1 piece of 2 m) just above that line
- Cover with the attaching pads and embroidery thread
- Using a bag you own as an example, check how to work the adjustable buckle and rectangle loop and sew together where required.
- Cut a piece of strap of 35 cm.
- Sew the middle 15 cm together
- Attach the strap to the back panel in the centre of the bag about 66 cm from the bottom
- Cover with the attaching pads and embroidery thread as before
- Stitch the D-ring to the strap on the front of the bag
- Stitch an adjustable buckle and the snap hook to the other strap.


Attaching lining to bag
- Pop the lining in the bag and pin edges together.
- Sew edges together
- Trim raw edge
- Cover the edge with the cotton tape.


You have finished your bag!
If desired you can embellish your bag after it has been finished or after step 1 of making the outside bag to make it easier to sew things on your bag. I am still deciding whether I might do a bit of applique on the front but I had to stitch one of my new leather Stitching Sheep labels on the front which were made by the lovely ladies at Wolcafé. Check out their website to make your own custom leather labels or custom wooden buttons.
It might look like a simple bag but I am really happy with the way it turned out, especially since it is my very first proper sewing effort. I can’t wait to take it on its first trip on the Eurostar in October.


Your bag looks really great.
LikeLiked by 1 person
Thank you!
LikeLike
Goed gedaan! Ik heb je blog gevonden via de newsletter van Inspirations. Leuk dat jij ook naar de RSN gaat. Veel plezier!
LikeLiked by 1 person
Hoi Jessica, leuk dat je mij gevonden hebt! Hopelijk vind je The Stitching Sheep leuk genoeg om te volgen. Heb jij ook de cursus bij de RSN gedaan?
LikeLike
Ja, en ben zelfs een tijdje docente bij ze geweest. Een jaar lang (2012/2013) heeft de RSN zelfs in Capelle aan den IJssel gezeten en ik was het ‘hoofd’ van deze afdeling.
LikeLiked by 1 person
Oh wow! Ik heb net je website gezien en je hebt echt hele gave dingen geborduurd. Hoop dat de mijne ook zo mooi worden. Ik wist helemaal niet dat de RSN ook in Nederland heeft gezeten, het zou wel top zijn geweest als ze daar nog zaten want dan is maar een half uur rijden voor mij!
LikeLike
Hahaha, ik heb net gelezen dat je ook een archeologe bent! Geweldig! Helaas was het voor de RSN niet lucratief genoeg om in Nederland te blijven. En ik wilde graag weg uit de drukke randstad, waar ik nooit heb kunnen wennen. Nu heb ik het erg naar m’n zin in Bad Bayersoien! Helaas wilde de RSN niet meeverhuizen. Terwijl er een andere ex-docente, Marina Berts, in de buurt in Lausanne zit. Wij hadden het wel zien zitten een alpen-afdeling op te zetten. Vooral omdat ik vloeiend Duits spreek en Marina Frans. Maar al die buitenlandse talen en gewoontes waren de RSN toch wat te veel van het goede; het blijven tenslotte eilanders ;).
LikeLiked by 1 person
Ja wat toevallig! en ook gepromoveerd! Zijn er twee bordurende archeologen! Werk je nog steeds als archeoloog in Duitsland? Nee, dat snap ik wel dat het niet lucratief genoeg was voor de RSN, in Nederland leeft borduren (anders dan kruisteek) volgens mij niet zo heel erg. Is het in Duitsland populairder?
LikeLike
Nee, maar het land is groter. En dan heb je nog de buren Oostenrijk en Zwitserland (en Nederland is niet ver weg!). Bovendien moet ook hier alles snel en goedkoop. En natuurlijk met een perfect resultaat. Af en toe doe ik nog een beetje archeologie. Al is dat voor nederland nu afgelopen; ik kwam niet door de registratie. Mijn werkervaring is vooral buiten noord-west Europa opgedaan zoals gedefineerd in de KNA. Vreemd hoor, ben je gepromoveerd, heb je artikelen in peer-reviewed tijdschriften staan en een handige internetdatabase op je naam staan, maar voor de nederlandse archeologie blijkbaar niet goed genoeg. Naast het borduren blijft echter niet veel tijd over, dus misschien goed dat de keuze nu voor mij gemaakt is welke richting het op gaat :). Doe jij nog iets in de archeologie?
LikeLiked by 1 person
Ja dat scheelt.
Ik werk wel als archeoloog (bij een landelijk ingenieursbureau en gedetacheerd bij een gemeente), en ben ook geregistreerd. Ik doe vooral veel advieswerk, PvEs, bureauonderzoeken, en GIS-tekenen omdat ik dat allemaal het leukste vind. Het is inderdaad heel gek dat een PhD niets oplevert voor de archeologie. Ook voor mijn werk had het niet uitgemaakt als ik niet gepromoveerd zou zijn.
In januari ben ik begonnen met mijn site en met nog meer borduren, het neemt bijna al mijn vrije tijd in beslag, maar vind het erg leuk om er mee bezig te zijn en het te delen met anderen.
LikeLike
Wow – this is super and certainly puts my efforts with a bed sheet to shame! Brilliant post, if I have time I may be making a new bag now!!
LikeLiked by 1 person
Thank you! I am really glad I spotted your post though as it inspired me to have a go myself and to write the how-to, as there was at least one other who was looking for a nice bag to carry her slate frame in!
LikeLiked by 1 person
It looks very fine – well done!
LikeLiked by 1 person
Thank you!
LikeLike